揭秘Koa原理,带你实现一个mini-koa
上一篇讲解了 koa 洋葱模型是如何实现的,并写了一个最小实现方案,这一篇讲全面讲解 koa 源码实现的细节,看看有哪些点值得我们学习。
_koa@2.14.1@koa
├─History.md
├─LICENSE
├─Readme.md
├─package.json
├─lib
|  ├─application.js
|  ├─context.js
|  ├─request.js
|  ├─response.js
|  └test.md
├─dist
|  └koa.mjs
koa库的文件结构非常简单,实现的逻辑都在lib目录下面,一共有四个模块,分别是application、context、request、response。
delegates 库是干什么用的
在讲解源码之前,先要介绍一下一个库:delegates。
context的部分实现就是用这个库,将一些方法和属性在访问的时候委托(或者说代理)到了request和respone上(类似于Object.defineProperty)。
delegates 接收两个参数,一个是 proto,一个是 target,proto 是访问对象,target 是代理对象。
delegate(proto, target).setter(name)注册 setter 的 name,比如当给 proto[name]赋值的时候,其实是给 target[name]赋值delegate(proto, target).getter(name)注册 getter 的 name,比如当获取 proto[name]的值的时候,得到的是 target[name]的值delegate(proto, target).access(name)access 是既注册了 setter,又注册了 getter,实现了真正的完全代理,不管赋值还是取值,都是代理到了 target 对象上。delegate(proto, target).method(name)注册 method 的 name,当proto[name]()调用一个方法时,相当于 target[method]()。 例如:
const delegate = require("delegates");
const proto = {};
let target = {
    foo: () => {
        return "foo";
    },
};
proto.target = target;
delegate(proto, "target").method("foo");
// 当访问proto.foo()时,其实是代理到了target对象的foo方法
console.log(proto.foo()); // 'foo'

// Object.defineProperty实现
const proto = {};
let target = {
    foo: () => {
        return "foo";
    },
};
proto.target = target;
Object.defineProperty(proto, "foo", {
    get() {
        return target["foo"];
    },
});
console.log(proto.foo()); // 'foo'
new koa 做了什么?
koa 源码地址 让我们通过一个简单的 demo,来一步步实现 mini-koa。
const Koa = require("koa");
const app = new Koa();

app.use(async (ctx, next) => {
    ctx.body = "hello world";
});

app.listen(3000);
源码展示: 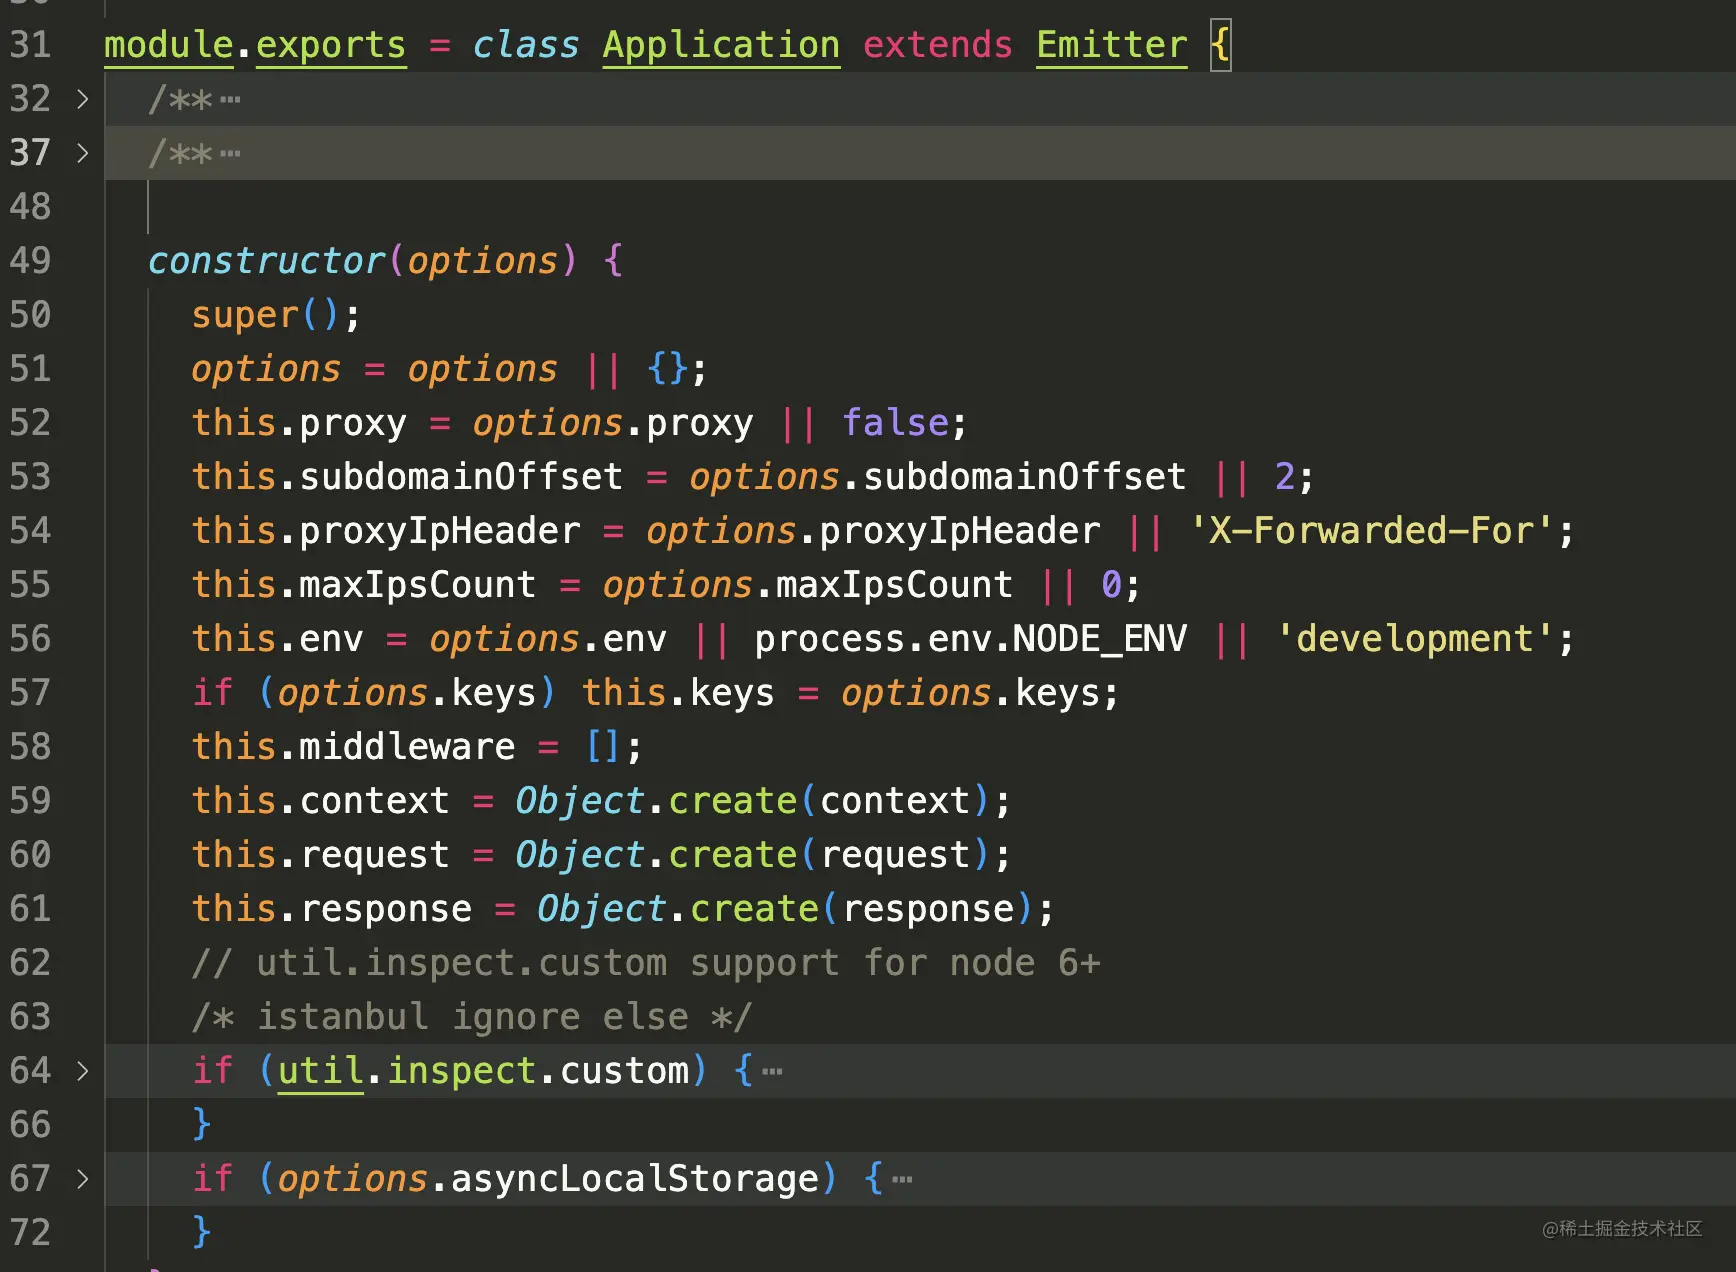 去除一些不影响主逻辑的代码,
constructor函数其实只创建了四个变量。
// index.js
const Emitter = require("events");
const context = require("./context.js");
const request = require("./request.js");
const response = require("./response.js");
class Application extends Emitter {
    // 继承events模块,方便监听
    constructor(options) {
        super();
        this.middleares = []; // 用于收集中间件
        this.context = Object.create(context);
        this.request = Object.create(request);
        this.response = Object.create(response);
    }
}
实现 use 和 listen
  use(fn) {
    if (typeof fn !== 'function') throw new TypeError('middleware must be a function!');
    if (isGeneratorFunction(fn)) {
      deprecate('Support for generators will be removed in v3. ' +
                'See the documentation for examples of how to convert old middleware ' +
                'https://github.com/koajs/koa/blob/master/docs/migration.md');
      fn = convert(fn); // 将generators函数转成async函数
    }
    debug('use %s', fn._name || fn.name || '-');
    this.middleware.push(fn);
    return this;
  }
去掉一些边界判断条件,use方法其实只做了两件事:1.收集中间件;2.返回 this,支持链式调用。再看listen方法。
  listen(...args) {
    debug('listen');
    const server = http.createServer(this.callback());
    return server.listen(...args);
  }
listen方法也很简单,就是利用http模块,创建了一个服务,并传入了一个this.callback回调函数,同时将参数透传给http服务的listen方法。
http.createServer 接收一个回调函数,参数形式为:http.createServer((res, req) => {})
继续完善我们的 mini-koa
// index.js
const Emitter = require("events");
const context = require("./context");
const request = require("./request");
const response = require("./response");
const http = require("http");
class Application extends Emitter {
    constructor(options) {
        this.middleares = [];
        this.context = Object.create(context);
        this.request = Object.create(request);
        this.response = Object.create(response);
    }
    use(middleare) {
        this.middleares.push(middleare);
        return this;
    }
    listen(...args) {
        const server = http.createServer(this.callback());
        return server.listen(...args);
    }
    callback() {
        return (req, res) => {
            // todo
        };
    }
}
实现完整版的 compose 函数
继续看看源码的callback如何实现:
  callback() {
    const fn = compose(this.middleware);
    if (!this.listenerCount('error')) this.on('error', this.onerror);

    const handleRequest = (req, res) => {
      const ctx = this.createContext(req, res); // 创建了context对象
      return this.handleRequest(ctx, fn);
    };

    return handleRequest;
  }
  handleRequest(ctx, fnMiddleware) {
    const res = ctx.res;
    res.statusCode = 404;
    const onerror = err => ctx.onerror(err);
    const handleResponse = () => respond(ctx);
    onFinished(res, onerror);
    return fnMiddleware(ctx).then(handleResponse).catch(onerror);
  }
  createContext(req, res) { // 创建一个context,并且定义了对外暴露context的属性
    const context = Object.create(this.context);
    const request = context.request = Object.create(this.request); // 挂在koa的request
    const response = context.response = Object.create(this.response); // 挂载koa的response
    context.app = request.app = response.app = this; // 挂载app实例
    context.req = request.req = response.req = req; // 挂载原生的req对象
    context.res = request.res = response.res = res; // 挂载原生的res对象
    request.ctx = response.ctx = context;
    request.response = response;
    response.request = request;
    context.originalUrl = request.originalUrl = req.url;
    context.state = {};
    return context;
  }
首先看callback函数第一行代码const fn = compose(this.middleware),利用compose函数,组合了中间件,返回了一个fn,后面将fn传给了this.handleRequest()的第二个参数(第一个参数是context)。在this.handleRequest这个函数里面,fn被命名为fnMiddleare,最后this.handleRequest是返回了fnMiddleware(ctx).then(handleResponse).catch(onerror),所以可以得到以下几点:
- 调用
compose函数返回的是一个 fn 函数,这个函数接收context作为参数 - 调用
fn函数返回了一个promise
所以在上一篇原来 koa 实现洋葱模型只有 11 行代码文章的基础之上,稍微修改一下即可。
// compose.js
function compose(middleares) {
    return function fn(context) {
        // 1. fn接收一个context作为参数
        let index = -1;
        function dispatch(i) {
            // 2. dispatch必须返回的是一个promise
            if (i <= index)
                return Promise.reject(new Error("next() called multiple times"));
            index = i;
            let middleare = middleares[i];
            // 别忘记fn函数的返回值是一个promise
            if (!middleare) return Promise.resolve();
            try {
                return Promise.resolve(middleare(context, dispatch.bind(null, i + 1)));
            } catch (err) {
                return Promise.reject(err);
            }
        }
        return dispatch(0); // 返回dispatch的执行结果
    };
}
实现 Context(利用 delegates 委托机制)
koa 的 Context 源码地址 伪代码如下:
const delegate = require('delegates');

const proto = module.exports = {
  ...
  inspect(){
    // ...
  }
  ...
}
delegate(proto, 'response')
.method('attachment')
.access('body')

delegate(proto, 'request')
.method('get')
.access('method')
.getter('href')
前面已经简单讲过delegates的使用方法,context除了一些自身定义的方法之外,还有许多方法是直接委托到response和request上。
实现 request/response
// request.js
module.exports = {
  get method(){
    return this.req.method;
  },
  set method(val) {
    return this.req.method = val;
  }
  ...
}
koa的request是在原生的req基础之上,做了很多方法的封装,方便操作;response也是同理的,这里不再展开讨论。
错误拦截
注册错误函数
// application.js
callback() {
  ...
  // 检测有没有已经注册过error事件
  if (!this.listenerCount('error')) this.on('error', this.onerror);
  ...
}

onerror(){
    const isNativeError =
      Object.prototype.toString.call(err) === '[object Error]' ||
      err instanceof Error;
    if (!isNativeError) throw new TypeError(util.format('non-error thrown: %j', err));

    if (404 === err.status || err.expose) return;
    if (this.silent) return;

    const msg = err.stack || err.toString();
    console.error(`\n${msg.replace(/^/gm, '  ')}\n`);
}
如上图,new koa的时候,会先检测app实例上有没有你自己写的error事件,比如app.on('error', () => {}),如果有的话,就用你的;如果没有的话,就注册this.onerror函数。this.onerror函数主要就是将错误信息用console.error方法打印出来。
拦截中间件错误
在this.handleRequest函数里面,可以看到fnMiddleare是一个promise,也就是说当中间件里面发生错误的时候,就会走到catch函数,调用ctx.onerror方法。
// application.js
handleRequest(ctx, fnMiddleware) {
    ...
    const onerror = err => ctx.onerror(err);
    const handleResponse = () => respond(ctx);
    return fnMiddleware(ctx).then(handleResponse).catch(onerror);
}
继续看看ctx.onerror方法
// context.js
  onerror(err) {
    if (null == err) return;
    const isNativeError =
      Object.prototype.toString.call(err) === '[object Error]' ||
      err instanceof Error;
    if (!isNativeError) err = new Error(util.format('non-error thrown: %j', err));
    ...
    // delegate
    this.app.emit('error', err, this); // 触发error事件,将错误信息发射到app.onerror
    const { res } = this;
    ...
    // respond
    const code = statuses[statusCode];
    const msg = err.expose ? err.message : code;
    ...
    res.end(msg);
  },
当中间件发生错误时,ctx.onerror方法会调用this.app.emit('error', err, this)方法,由于之前我们已经注册过app的onerror方法了,就会将错误信息打印出来。
emit 和 on 方法都是 application 继承自 Events 模块
ctx.body 是如何做到的
// application.js
handleRequest(ctx, fnMiddleware) {
    ...
    const onerror = err => ctx.onerror(err);
    const handleResponse = () => respond(ctx);
    return fnMiddleware(ctx).then(handleResponse).catch(onerror);
}
还是在application.js的this.handleRequest函数里面,当执行完fnMiddleare(ctx)之后会调用then方法,相当于调用了respond方法。
function respond(ctx) {
  ...
  const res = ctx.res;
  let body = ctx.body;
  const code = ctx.status;
  ...
  // responses
  if (Buffer.isBuffer(body)) return res.end(body);
  if ('string' === typeof body) return res.end(body);
  if (body instanceof Stream) return body.pipe(res);

  // body: json
  body = JSON.stringify(body);
  if (!res.headersSent) {
    ctx.length = Buffer.byteLength(body);
  }
  res.end(body);
}
可以看到,respond函数主要就是对body为Buffer、String、Stream、Json的类型分别判断处理。
总结
重新梳理一下koa的运行流程
- 当
new koa的时候,会实例化一些属性,主要有this.context、this.request、this.response、this.middleares; - 调用 use 的时候,将中间件收集起来,放到
this.middleares里面,等待后续一起处理(发布订阅模式); - 调用
listen的时候,会调用callback方法,组合了中间件,返回了fn函数,等待处理; - 当页面访问对应的端口的时候,就触发了
http的回调,开始执行handleRequest函数,然后依次执行中间件 - 如果中间件没有错误,就用调用
respond方法,将body内容传给http服务器;否则,调用catch方法
戳这里查看mini-koa源码,总体来说 koa 的源码并不复杂,唯一有点绕的地方可能就是 compose 函数了。有什么不懂或者我理解不对的地方,欢迎评论区讨论。
作者:sensFeng 链接:https://juejin.cn/post/7206871218031575077 来源:稀土掘金 著作权归作者所有。商业转载请联系作者获得授权,非商业转载请注明出处。